Considering Social Media Advertising

Spending money on advertising isn't required to find success on social media. Advertising is an option to consider on almost all social platforms, but it doesn't replace the power of creating engaging content and offering excellent online customer service.
If you're feeling confident with your current social media marketing efforts and want to consider advertising, review your options with these informative guides:
Boosting Posts
Boosting is a straightforward method of social media advertising that increases the reach of your posts. Social media posts that are boosted are often seen and engaged with by more people. Here's how it's done:
Facebook
- Pick an existing post on your Facebook page that you want to boost.
- Click Boost Post on the bottom right corner of your Facebook post.
- Pick a Goal.
- Add text.
- Choose a Button.
- Select an additional contact method.
- Identify a Special Ad Category.
- Choose your audience. If you want to make sure your post is seen by people who are already following you, you can select "People who like your page and their friends." If you want more people in your local community to see your post and learn about your agency, you can select "People in your local area." You can also create a custom audience using location and other demographics.
- Set your boosted post's budget and duration. Facebook will estimate how many people your post will reach based on what you select.
- Complete the process by clicking the Publish button or the Boost post now button.
Instagram
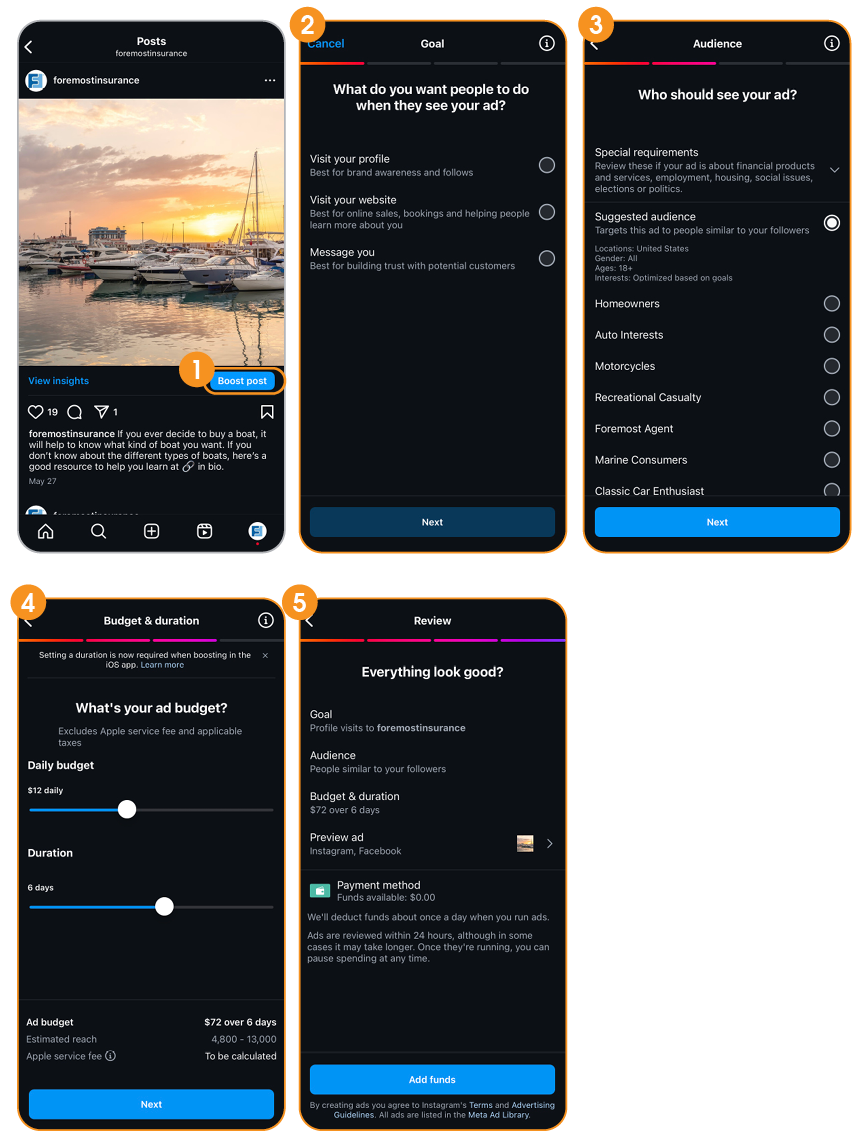
- Click the Boost post button below the post you'd like to boost.
- Pick a goal. Your options will be to attract more profile visits, website traffic or messages. We recommend more profile views if you're hoping to get more people following and engaging on your Instagram page. Website traffic is a good selection for driving more people to the link in your bio or a different link.
- Choose an audience. After choosing your goal, you can pick from three different targeting options: Automatic, Local and Manual. Automatic tells Instagram to target people who are just like your followers, Local lets you target people in a specific location, and Manual lets you create a custom audience based on location and interests.
- Choose an audience. After choosing your goal, you can pick from two different targeting options: Suggested or Create your own.
*Note: Be aware that in certain industries, like Insurance, you may need to label your ads with a special ad category. This will limit your targeting options to help you comply with current laws.
- Set your budget and duration. Instagram will estimate the expected reach that your post will attract based on your selections.
- Do a final review of the ad and then complete the process by clicking the Create Promotion button.
Meta Advertising: Traffic Campaigns
There are many types of campaign objectives you can choose from when developing ads through Meta — including Awareness, Traffic, Engagement, Leads, App Promotion and Sales. These various options make Meta a great place to start when considering advanced advertising on social media!
CAMPAIGN STRUCTURE
Before approaching this, it's important to understand the structure of a Meta Ads campaign. Every ad, even if it's a post boost, follows the structure of campaign > ad set > ads.
- The campaign settings apply to all lower tiers (ad set and ads). These settings determine the top-level strategy, such as campaign goals, special regulations and portfolio budget allocation options.
- The ad set, short for "ad settings," contains the meat of your ad setup. It's where you set the conversion metrics, performance goals, budget, targeting parameters and any placement exclusions you’d like to make. It applies to all creatives beneath it.
- Finally, the ad level. The ad level is where you build the actual ad itself, adjust any settings that may allow other versions to be generated and shown to your audience, and attach a Meta Pixel.
WHAT IS A PIXEL?
A Meta Pixel is a snippet of code installed on your agency website that sends your web data back to your Meta Business account. When you attach a Pixel to your ad, Meta is able to provide live attribution data about your ad performance. This is critical not only for improving your understanding of your ad's impact, but also for allowing Meta's algorithm to serve your ad effectively to the people most likely to convert.
Meta uses last click attribution, meaning it will attribute the conversion to the last click that occurred before leaving their platform. This is a subtle, but important distinction that might be useful when evaluating creative effectiveness.
If you're not familiar with websites, setup can seem a little daunting. So, you may want to involve your IT or web development team to help you. But provided the right access, setting up a Meta Pixel is something that you can do by following these steps:
- From Ads Manager, navigate to the Events Manager tab in the left-hand column.
- Click Connect Data.
- Choose a data source to draw from — in this case, you should choose Web.
- When asked to choose a data set, select Create new data set. Name your data set the name of the website or business you're setting up a pixel for.
- Now you'll need to select how you're going to connect. The easiest is usually Set up with partner integration; this can be achieved with certain web builders like WordPress or e-commerce stores like Shopify. Otherwise, you'll want to Set up with Conversions API Gateway. If that's not available, then set up manually.
- After this point, the process will vary depending on which option you've selected.
For more information on setting up your Meta Pixel, visit http://bit.ly/4mQOxAR.
CREATING A TRAFFIC AD CAMPAIGN
The primary ad objective we'd like to highlight is Traffic. Traffic ad campaigns focus on reaching your target audience on Facebook and Instagram, and sending them to your website, where they can learn more and get in touch with you.
Here's information on creating a Traffic ad campaign on Facebook:
- Navigate to Meta Business Suite.
- Select Ads Manager in the left column.
- Click Campaigns.
- Click Create.
- In the "Choose a campaign objective" section, select Traffic and then click Continue.
- At this point, choose a campaign setup. If you're a beginner, you can use the Tailored web traffic campaign settings and then press Continue. The Manual traffic campaign setup option is more advanced and offers a little more control.
- Meta will walk you through the steps, starting at the campaign level.
- Name your campaign.
- Assign any Special Ad Categories. This will help ensure that you are compliant with any digital advertising laws that pertain to your agency. Insurance services are in the Financial product and services special ad category, and homeowners insurance is included in the Housing special ad category.
- Click Next. You will now be brought to the ad set menu.
- Set your performance metrics, goals, budgets, and Start and End dates.
- Create a target audience using Facebook's location and other demographic features. Be sure to save and name the audience you create — you may want to use it again in the future.
- Click Next. You will now be brought to the ad level.
- Name your ad and choose your identity and partnership settings (for co-branded ads).
- Select an ad setup. This determines whether you're creating the ad here or pulling from a previously published post.
- Upload your ad media and write your copy (including primary post text, a headline, a link description and a call to action); also, enter your website's URL.
- View the ad previews and don't forget to select your Pixel.
- When finished, click the Publish button in the bottom-right corner.
Your ad will begin running on its scheduled start date. We recommend returning to Meta Business Suite frequently to check the progress, review the results and make adjustments as needed.

Here are a few tips on ad creative:
- Upload a short brand awareness video or an image of people enjoying one of the products you help them insure. For example, if you offer auto insurance, make your ad image a photo of someone smiling as they're driving a car.
- You can enter up to five options for primary text, headlines and link descriptions. We recommend utilizing all five because Facebook will test each copy option and optimize your ad for the best performance.
- Try using the "Learn more" or "Get quote" call to action buttons.
- Leveraging Advantage+ options (Meta's dynamic ad AI) can improve your ad performance by adjusting your ad to better suit the audience or placement your ad is served in, but it's important to note this can be dangerous. Meta's AI isn't always reliable and may sometimes waste your ad dollars if targeting parameters weren't set up correctly. For this reason, we don't recommend toggling the Languages setting on.